How to Start a Blog Without WordPress Bullshit (Free, 7x Faster)
Table of Contents
Every “how to start a blog” tutorial recommends WordPress hosted on Bluehost/SiteGround/WP Engine. Here’s why: Bluehost pays ~$100 per sale. SiteGround pays $50-120. WP Engine pays $200+. Search results aren’t optimized for helping you, they’re optimized for affiliates making $100 commissions.
I’m going to show you how to build a developer blog with Astro and Cloudflare Pages. It costs $0/month, loads 7x faster than WordPress, and requires zero maintenance. I make exactly $0 recommending this stack because Cloudflare doesn’t have an affiliate program and Astro is open source.
This is why this guide doesn’t exist anywhere else.
Time to complete: 30-45 minutes from zero to deployed blog.
The Commission Scam Nobody Mentions
WordPress hosting affiliate programs are the dirty secret behind every “how to start a WordPress blog” article. Here’s the money trail:
- Bluehost: ~$100/sale
- SiteGround: $50-120/sale
- WP Engine: $200+/sale
- GoDaddy: $75-100/sale
Search “how to start a blog” on Google and count how many results push WordPress + high-commission hosting. Every. Single. One. Because that’s where the money is. I should know, I did it too.
My transparency: I could make $100 right now sending you to Bluehost. Instead, I’m making $0 telling you about a better solution. This is exactly why traditional “how to create a blog” guides won’t write this article.
- Cloudflare Pages: $0 (free blog hosting, don’t have an affiliate program)
- Astro: $0 (open-source blog platform, also doesn’t have an affiliate program)
Who This Guide Is For
- Developers who want a fast blog
- Startups needing performant marketing sites
- Anyone comfortable with git and markdown
- People tired of WordPress plugin hell
Who Should Stick With WordPress
Be honest with yourself. Static site generators are not content management systems, and pretending they are leads to frustration. Stick with WordPress if you:
- Have non-technical clients who need a GUI
- Need complex membership/paywall features
- Won’t touch the command line
- Require extensive user roles and permissions
- Have user-generated content requirements
The rest of this guide assumes you’re a developer who wants to build a blog, not a CMS for a content team.
The WordPress Performance Problem (Real Data)
Let’s skip the hypotheticals. I migrated websiterating.com from WordPress to Astro in October 2026. Here are the actual PageSpeed Insights results from pagespeed.web.dev.
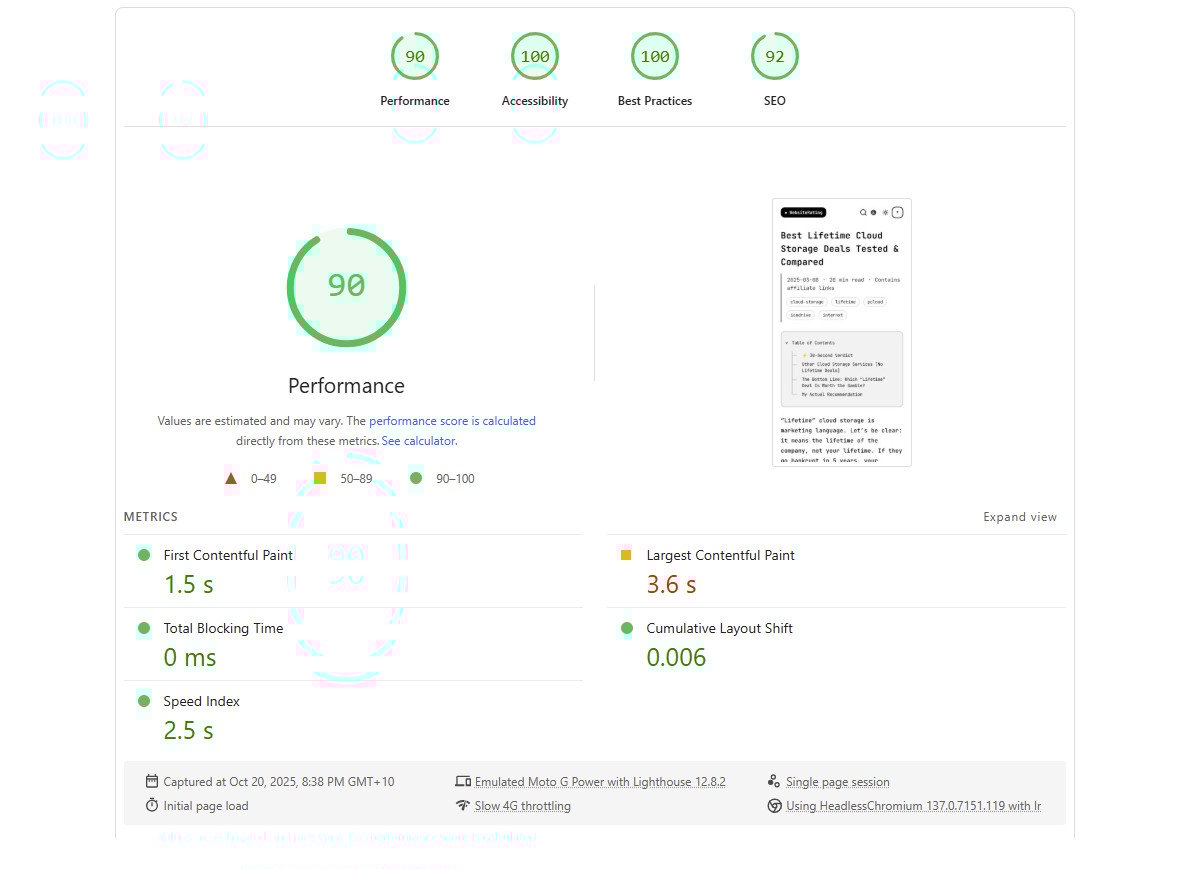
Homepage Performance: Before vs After
| Homepage Before | Homepage After |
|---|---|
 |  |
WordPress (Before Migration):
- Performance Score: 77 (needs improvement)
- First Contentful Paint: 3.2s (slow)
- Largest Contentful Paint: 3.4s (slow)
- Speed Index: 9.6s (very slow)
- Total Blocking Time: 50ms (good)
Astro (After Migration):
- Performance Score: 90 (✅ good)
- First Contentful Paint: 1.5s (✅ good)
- Largest Contentful Paint: 3.6s (needs improvement)
- Speed Index: 2.5s (✅ good)
- Total Blocking Time: 0ms (✅ excellent)
Homepage improvement ✅: Performance score increased 17%, FCP improved 53%, Speed Index improved 74%.
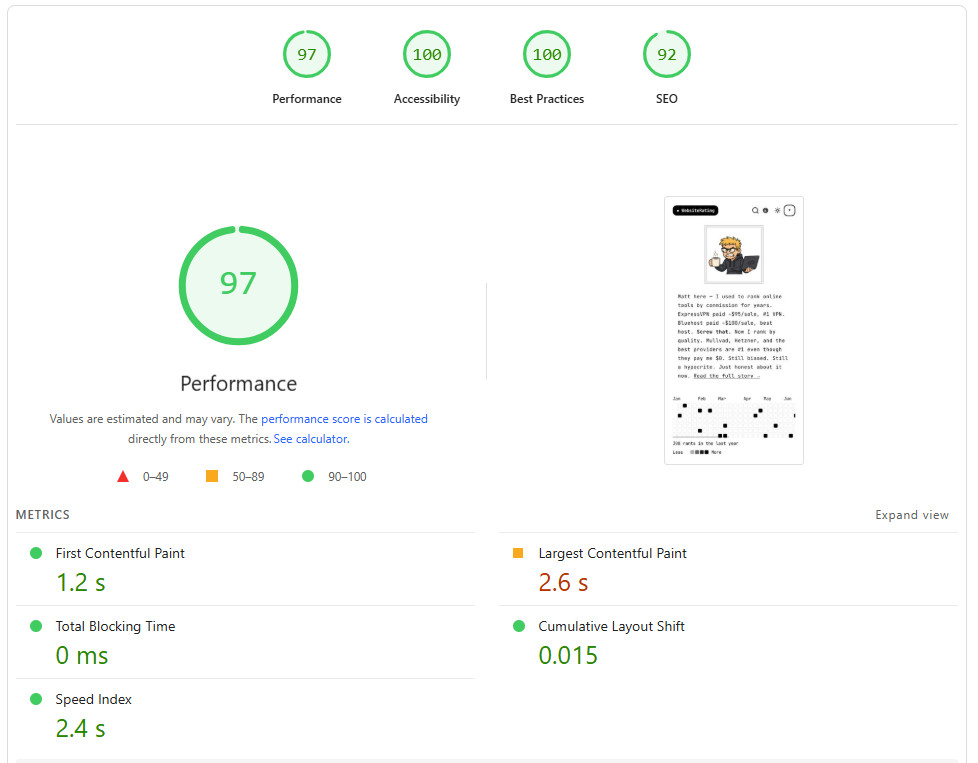
Blog Post Performance: The Real Difference
Homepage performance matters, but blog posts are where readers spend time. The blog post results are even more dramatic.
| Blog Post Before | Blog Post After |
|---|---|
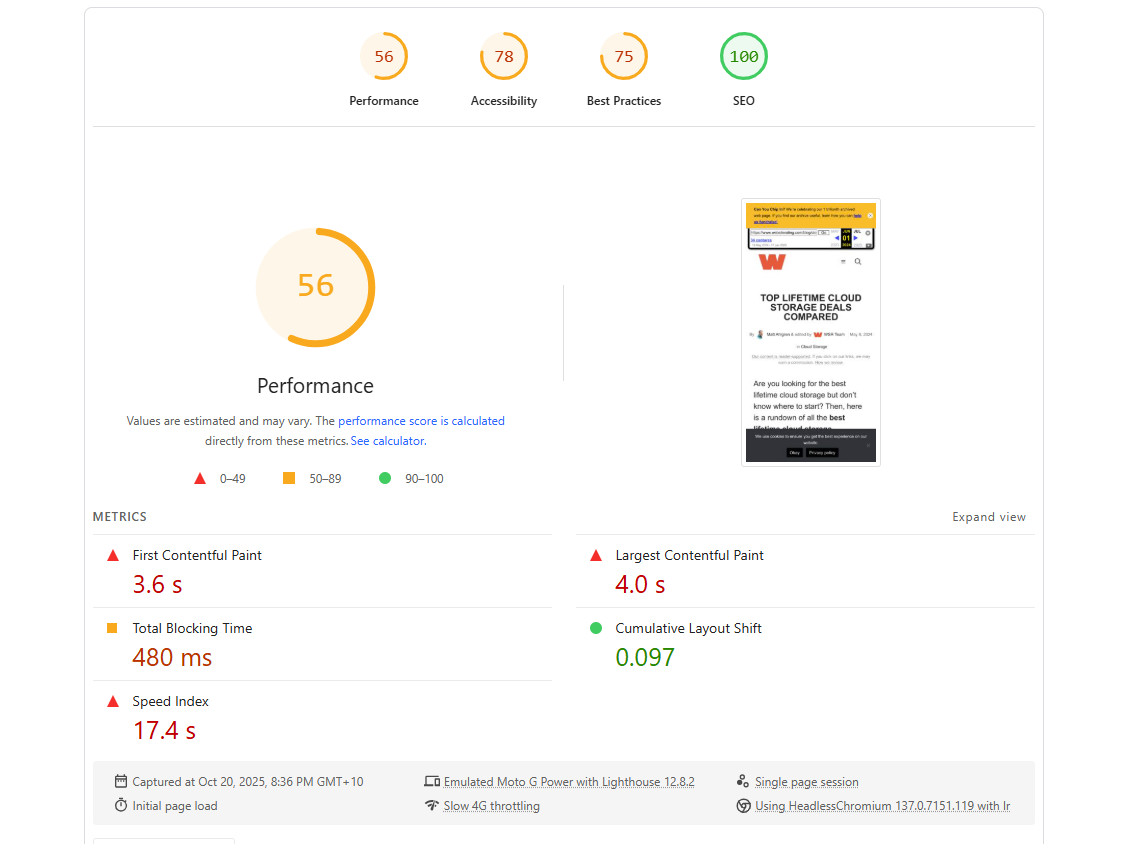 |  |
WordPress Blog Post (Before):
- Performance Score: 56 (poor)
- First Contentful Paint: 3.6s (slow)
- Largest Contentful Paint: 4.0s (slow)
- Speed Index: 17.4s (extremely slow)
- Total Blocking Time: 480ms (poor)
Astro Blog Post (After):
- Performance Score: 97 (✅ excellent)
- First Contentful Paint: 1.2s (✅ good)
- Largest Contentful Paint: 2.6s (✅ good)
- Speed Index: 2.4s (✅ good)
- Total Blocking Time: 0ms (✅ excellent)
Blog Post improvement ✅: Performance score increased 73%, FCP improved 67%, LCP improved 35%, Speed Index improved 86%, TBT eliminated entirely.
What Changed?
The difference comes down to PHP execution and database queries versus pre-built HTML served from a CDN. WordPress has to process your request, query the database, execute PHP, render HTML, then send it. Astro already has the HTML built and cached globally.
WordPress stack (websiterating.com before):
- PHP 8.1 execution
- MySQL database queries
- 12+ plugins active
- Theme processing
- Multiple HTTP requests for assets
- Server-side rendering on every page load
Astro stack (websiterating.com now):
- Pre-built static HTML
- Served from Cloudflare’s edge (300+ locations)
- Zero database queries
- Zero PHP execution
- Minimal JavaScript (only where needed)
- Assets optimized at build time
The Speed Index improvement from 17.4s to 2.4s on blog posts is the real story. That’s an 86% improvement in perceived loading speed. Readers see content 7x faster.
The Accessibility Bonus
Notice the accessibility scores:
- WordPress: 78-82 (needs improvement)
- Astro: 100 (✅ perfect)
This wasn’t intentional. Astro’s default templates follow web standards better than most WordPress themes. You get accessible HTML by default without installing plugins like WP Accessibility.
The WordPress Plugin Tax
WordPress sites typically run 15-30 plugins, each adding database queries, HTTP requests, and CSS/JS bloat. Websiterating.com before migration ran:
- Yoast SEO: Meta tag management, sitemap generation
- WP Rocket: Caching to mitigate performance issues
- Contact Form 7: Basic form handling
- Akismet: Comment spam filtering
- Social sharing plugins: Add share buttons
- Analytics plugins: Track visitors
- Security plugins: Monitor for attacks
Each plugin adds weight. Each plugin needs updates. Each plugin is a potential security hole.
Astro equivalent:
- SEO: Built-in (XML sitemaps, robots.txt support, canonical URLs, full meta tag frontmatter for OG/Twitter cards, schema markup ready)
- Caching: Not needed (static HTML cached globally)
- Forms: Netlify Forms, Web3Forms, or simple API calls
- Comments: Giscus (GitHub Discussions)
- Sharing: Static HTML buttons
- Analytics: Cloudflare Web Analytics
- Security: Nothing to attack (no database, no PHP)
Zero plugins. Zero maintenance overhead.
The Maintenance Nightmare
WordPress requires:
- Weekly plugin updates (security vulnerabilities if you skip)
- Theme updates that occasionally break your design
- PHP version compatibility checks
- Database optimization to prevent slowdowns
- Backup management
- Security monitoring
Even if you don’t add new content often, WordPress requires regular updates to the core, plugins, and themes to maintain performance and security.
Astro requires:
git push
That’s it. No updates to babysit. No security patches. No database optimization. The site is pre-built HTML, there’s nothing to attack.
🎯 The Astro + Cloudflare Pages Alternative
Why This Stack
Astro ships zero JavaScript by default, rendering content to static HTML at build time. Cloudflare Pages deploys your site to 300+ global edge locations with automatic SSL, DDoS protection, and unlimited bandwidth on the free tier.
What you get:
- Build time: 2-10 seconds for typical blogs
- Deploy time: ~30 seconds global distribution
- SSL: Automatic and free
- DDoS protection: Built-in
- Bandwidth: Unlimited (free tier)
- Cost: $0/month for most blogs (500 builds/month)
The Tradeoffs (Brutal Honesty)
What you lose:
- No GUI content editor (markdown files only)
- Can’t easily hand off to non-technical writers
- Comments require third-party integration
- Search needs implementation
- Dynamic content requires additional setup
What you gain:
- 7-10x faster load times (documented above with real data)
- Zero maintenance beyond content
- Full version control via git
- No security updates to babysit
- No hosting fees for typical use cases
- Complete control over code
Static sites are fast and clean because no code runs in the reader’s browser, making them inherently privacy-respecting with no trackers by default.
Still here? Good. That means this stack makes sense for you. Let’s build this thing.
Your Setup Path: Choose Your Route (15-30 minutes)
I’m not going to copy-paste Astro’s setup documentation. They maintain it better than I ever could, and it stays current when things change.
Route A: Start From Scratch (15-20 minutes)
Follow the official guides:
Important: The official guides will instruct you to add the Cloudflare adapter with npm run astro add cloudflare. Follow those steps exactly. The adapter is required for Cloudflare Pages deployment.
What you’ll get: Blank Astro project deployed to Cloudflare Pages at your-project.pages.dev
Route B: Pick a Theme - Recommended (20-30 minutes)
Don’t waste time browsing 100 themes. Here’s what actually works:
Best choice for developers: AstroPaper
Why this one:
- Accessibility: 100/100 out of the box
- Lightweight: No bloat, fast by default
- SEO optimized: Proper meta tags, sitemap, RSS included
- Active maintenance: Regular updates
- TypeScript support: Type-safe frontmatter
- Dark mode: Built-in
Setup:
npm create astro@latest my-blog -- --template satnaing/astro-paper
cd my-blog
npm install
npm run dev
Open http://localhost:4321 and you’ve got a working blog locally.
Alternative if you prefer Tailwind: Astro Boilerplate
Want to browse more? All Astro Themes - Filter by “Blog” tag.
Install the Cloudflare Adapter (CRITICAL STEP)
Before you can deploy to Cloudflare Pages, you must add the Cloudflare adapter to your project:
npm run astro add cloudflareThis command does three things:
- Installs
@astrojs/cloudflarepackage to your dependencies - Updates your
astro.config.mjswith the adapter configuration - Configures your project for Cloudflare Pages deployment
What you’ll see after running it:
In astro.config.mjs:
import { defineConfig } from 'astro/config';
import cloudflare from '@astrojs/cloudflare';  // ← Added automatically

export default defineConfig({
  site: 'https://yourdomain.com',
  adapter: cloudflare(),  // ← Added automatically
});
In package.json:
{
  "dependencies": {
    "@astrojs/cloudflare": "^x.x.x"  // ← Added automatically
  }
}
This is not optional. Without this step, your build will fail on Cloudflare Pages.
Next: Deploy using the Cloudflare Pages Astro Guide. Takes 5 minutes.
Go follow their deployment guide. I’ll be here when you get back with that sweet *.pages.dev URL.
What Happens Next: Understanding Your Workflow (10 minutes)
You followed the guides. You’ve deployed. You have a live URL. Most tutorials stop here. Let’s walk through the actual day-to-day workflow.
Your New Publishing Process
Old WordPress way:
- Log into wp-admin
- Posts → Add New
- Write in visual editor (which breaks your code blocks)
- Click Publish
- Check if plugin updates broke layout
- Monitor security patches
- Repeat weekly
New Astro way:
- Open VS Code
- Create markdown file:
src/content/blog/my-post.md - Write post
git push- Site deploys in 60 seconds
That’s it. No step 6. No step 7.
Your Project Structure
your-blog/
├── src/
│   ├── content/
│   │   └── blog/          ← YOUR POSTS LIVE HERE (90% of your time)
│   ├── pages/             ← Routes (/, /about, /blog)
│   ├── layouts/           ← Page templates
│   ├── components/        ← Reusable UI pieces
│   └── styles/            ← CSS files
├── public/                ← Static assets (images, favicon)
├── astro.config.mjs       ← Configuration
└── package.json           ← Dependencies
The only folder you’ll touch regularly: src/content/blog/
Writing Your First Post (5 minutes)
Step 1: Create the file
# From your project root
touch src/content/blog/hello-world.md
Step 2: Add frontmatter + content
---
title: "How I Escaped WordPress Hell"
description: "From 17.4s load times to 2.4s"
pubDate: 2026-10-20
author: "Your Name"
tags: ["webdev", "performance"]
---
Write in markdown like a normal human. No visual editor breaking your formatting.
## Subheadings Work
Code blocks work perfectly:
` ``javascript
// No WordPress shortcodes breaking your syntax
console.log("Finally, proper highlighting");
` ``
Images are simple:

Internal links work:
Read [my about page](/about) for context.Step 3: Add image (if needed)
- Drop image in
public/images/ - Reference it:

Step 4: Preview locally
npm run dev
# Open http://localhost:4321
# See your post immediately
# Save file → instant reload
Step 5: Deploy
git add .
git commit -m "Add first post"
git push
Cloudflare detects push → builds site (~30 seconds) → deploys globally. Your post is live.
No “Publish” button. No admin panel. Just git push.
Real-World Daily Usage
Morning coffee, new post idea:
cd my-blog
npm run dev
touch src/content/blog/new-idea.md
# Write in VS Code while previewing at localhost:4321
Ready to publish:
git add .
git commit -m "Post: Why WordPress is slow"
git push
# Grab coffee. Blog updates in 60 seconds.
Total time from idea to published: 5 minutes.
Compare that to WordPress: Log in → wait for dashboard → deal with plugin update nag → fight visual editor → publish → check if something broke → fix → curse → done (20 minutes).
Adding Pages (3 minutes)
Need an About page? Create file in src/pages/:
touch src/pages/about.astroBasic structure:
---
import Layout from '../layouts/Layout.astro';
---

<Layout title="About">
  <h1>About Me</h1>
  <p>I build fast blogs. WordPress is slow.</p>
</Layout>
File-based routing:
src/pages/about.astro→yoursite.com/aboutsrc/pages/uses.md→yoursite.com/usessrc/pages/blog/[slug].astro→ Dynamic routes (already set up)
Making It Yours: Exact Customization Guide (15 minutes)
No vague “check your config” bullshit. Here are the exact files to edit.
Change Site Info & Branding
File: src/config.ts (or similar, depends on theme)
What to change:
export const SITE = {
  title: 'Your Blog Name',           // ← Change this
  description: 'Your tagline here',  // ← Change this
  author: 'Your Name',               // ← Change this
  email: '[email protected]',          // ← Change this
  website: 'https://yourdomain.com', // ← Change when you add domain
  defaultLanguage: 'en',
};

export const SOCIALS = {
  github: 'yourusername',              // ← Change this
  twitter: 'yourhandle',               // ← Change this
  linkedin: 'yourprofile',             // ← Change this
};
Update Navigation Links
File: Depends on theme, usually src/components/Header.astro or src/config/menu.ts
Example (Header.astro):
<nav>
  <a href="/">Home</a>
  <a href="/blog">Blog</a>
  <a href="/about">About</a>     <!-- ← Add/remove links here -->
  <a href="/uses">Uses</a>       <!-- ← Custom pages go here -->
</nav>
Example (menu.ts config):
export const MENU_LINKS = [
  { text: 'Home', href: '/' },
  { text: 'Blog', href: '/blog' },
  { text: 'About', href: '/about' },  // ← Add/remove here
  { text: 'Uses', href: '/uses' },    // ← Custom links
];
Customize Colors & Fonts
File: src/styles/global.css or tailwind.config.cjs
For vanilla CSS (global.css):
:root {
  --color-primary: #3b82f6;      /* ← Your brand color */
  --color-text: #1f2937;         /* ← Text color */
  --color-bg: #ffffff;           /* ← Background color */
  --font-base: 'Inter', sans-serif;  /* ← Your font */
}

.dark {
  --color-text: #f9fafb;         /* ← Dark mode text */
  --color-bg: #111827;           /* ← Dark mode bg */
}
For Tailwind (tailwind.config.cjs):
module.exports = {
  theme: {
    extend: {
      colors: {
        primary: '#3b82f6',        // ← Your brand color
      },
      fontFamily: {
        sans: ['Inter', 'system-ui'],  // ← Your font
      }
    }
  }
}
Update Astro Config
File: astro.config.mjs
The Cloudflare adapter was already added when you ran npm run astro add cloudflare. Your file should look like this (already configured):
import { defineConfig } from 'astro/config';
import cloudflare from '@astrojs/cloudflare';

export default defineConfig({
  site: 'https://yourdomain.com',  // ← Change this when you add your custom domain
  adapter: cloudflare(),
  // Other settings usually fine as-is
});
What you might need to change:
site: Update when you purchase a custom domain- Everything else: Usually doesn’t need changes for a blog
Add Your Own Images
Favicon & Logo:
- Replace files in
public/(usuallyfavicon.svg,logo.svg) - Or use theme’s dedicated assets folder (check theme docs)
Blog post images:
- Drop images in
public/images/ - Reference in markdown:

Or use Astro Image component (recommended for optimization):
---
import { Image } from 'astro:assets';
import heroImage from '../assets/hero.jpg';
---

<Image src={heroImage} alt="Description" />
Astro handles responsive images, WebP conversion, lazy loading automatically.
Essential Features Setup (20 minutes total)
Comments via Giscus (5 minutes)
Static sites don’t have databases. Solution: GitHub Discussions via Giscus.
Why Giscus:
- Free (uses your GitHub repo)
- No tracking
- GitHub auth filters spam
- Reactions, replies, moderation built-in
Setup:
-
Enable Discussions on your GitHub repo:
- Repo → Settings → Features → Check “Discussions”
-
Configure Giscus:
- Go to giscus.app
- Enter your repo:
yourusername/your-blog-repo - Select Discussion Category: “Comments” (or create one)
- Copy the generated script
-
Add to your blog layout:
File: src/layouts/BlogPost.astro (or similar)
---
// Your existing frontmatter
---

<Layout>
  <article>
    <h1>{frontmatter.title}</h1>
    <slot />
  </article>

  <!-- Add Giscus here -->
  <script src="https://giscus.app/client.js"
          data-repo="yourusername/your-repo"
          data-repo-id="YOUR_REPO_ID"
          data-category="Comments"
          data-category-id="YOUR_CATEGORY_ID"
          data-mapping="pathname"
          data-reactions-enabled="1"
          data-emit-metadata="0"
          data-theme="preferred_color_scheme"
          crossorigin="anonymous"
          async>
  </script>
</Layout>Alternatives:
- Utterances: Uses GitHub Issues instead of Discussions
- Disqus: Easy but tracks users, ads on free tier
- Commento: Privacy-focused, $10/month or self-hosted
Analytics via Cloudflare (5 minutes)
Why Cloudflare Web Analytics:
- Free forever
- No cookies (GDPR compliant)
- Privacy-respecting
- Shows what you need: page views, referrers, locations
Setup:
- Cloudflare Dashboard → Analytics → Web Analytics
- Click “Add a site”
- Enter your site URL
- Copy the beacon script token
Add to your layout:
File: src/layouts/Layout.astro (base layout)
---
// Frontmatter
---

<html>
  <head>
    <!-- Your existing head content -->

    <!-- Add Cloudflare Analytics -->
    <script defer
            src='https://static.cloudflareinsights.com/beacon.min.js'
            data-cf-beacon='{"token": "YOUR_TOKEN_HERE"}'>
    </script>
  </head>
  <body>
    <slot />
  </body>
</html>
What you get:
- Page views & unique visitors
- Top pages
- Referral sources
- Country/device/browser data
- All without tracking pixels or cookies
Paid alternatives (if you need more):
- Plausible: $9/month, beautiful UI
- Fathom: $14/month, similar features
I use Cloudflare. It’s free and doesn’t treat readers like ad targets.
RSS Feed (Already Built-In)
Good news: Astro themes include RSS by default.
Your feed: https://yoursite.com/rss.xml
Test it: Visit that URL. You should see XML with your posts.
Customize (if needed):
File: src/pages/rss.xml.js (or similar)
export const GET = async (context) => {
  const posts = await getCollection('blog');

  return rss({
    title: 'Your Blog Title',      // ← Change this
    description: 'Your RSS description',  // ← Change this
    site: context.site,
    items: posts.map(post => ({
      title: post.data.title,
      pubDate: post.data.pubDate,
      link: `/blog/${post.slug}/`,
    })),
  });
};
Search (Optional, 10 minutes)
Static sites don’t have database search. Solutions:
Option 1: Pagefind (Recommended)
- Free and open source
- Built at build time
- Fast client-side search
- No external service
npm install -D pagefindThen add to build script in package.json:
"scripts": {
  "build": "astro build && pagefind --source dist"
}
Full setup: Pagefind docs
Option 2: Algolia DocSearch
- Free for open source/docs sites (need approval)
- More features, external dependency
- Apply here
Option 3: Fuse.js (Simple)
- Pure JavaScript
- Client-side only
- Good for more than 100 posts
- Fuse.js docs
For most dev blogs, Pagefind is perfect.
Adding a GUI with Decap CMS (Optional, 15 minutes)
Earlier I said “What you lose: No GUI content editor (markdown files only)”. That’s not entirely true anymore.
Decap CMS is an open-source, git-based content management system that works beautifully with Astro + Cloudflare Pages. It gives you an admin panel GUI without sacrificing performance or your git-based workflow.
Why Decap?
- Free and open source
- No database (edits commit to your git repo)
- Markdown-based (same as your Astro blog)
- Works with Cloudflare Pages
- Minimal setup (one config file)
When to use Decap CMS:
- ✅ Small team needs occasional GUI access but you control the code
- ✅ Non-technical collaborators who need an interface
- ✅ Want GUI option without sacrificing performance
- ❌ Don’t use if: Heavy collaboration, complex workflows, or large teams needing permissions
Setup overview (simplified):
- Add Decap config to your repo
- Deploy your Astro site to Cloudflare
- Connect Decap to your GitHub repo (OAuth)
- Access admin panel at
yourdomain.com/admin - Writers use the GUI to create posts
- Changes automatically commit to git
The real difference from WordPress: Changes are git commits, not database rows. Your entire content history is version-controlled.
Decap isn’t better than markdown for solo developers, but if you’re handing content editing to someone who won’t touch the command line, it’s 10x better than WordPress while keeping all the performance benefits.
Full setup: Decap CMS + Astro Guide
Quick Command Reference (Bookmark This)
Daily workflow:
npm run dev              # Start local server (http://localhost:4321)
npm run build            # Build production version (test before deploy)
npm run preview          # Preview production build locally

git add .                # Stage all changes
git commit -m "message"  # Commit with message
git push # Deploy to Cloudflare (automatic)Troubleshooting:
npm install              # Reinstall dependencies
rm -rf node_modules      # Nuclear option: delete and reinstall
rm -rf .astro            # Clear Astro cache
npm run build            # Test build locally before pushing
Adding content:
touch src/content/blog/new-post.md    # Create new post
touch src/pages/new-page.astro        # Create new page
Checking for issues:
npm run build            # If this fails, Cloudflare will fail too
                         # Fix errors locally before pushing
The Cost Comparison (3-Year Reality Check)
WordPress Stack Costs
Year 1:
- Domain: $15 (or “free” with hosting, then $15/year)
- Hosting: $60-240 (promotional pricing)
- Premium theme: $50-100 (one-time)
- Essential plugins: $50-200/year (Yoast Premium, backups, etc.)
- Year 1 Total: $175-555
Years 2-3 (renewal hell begins):
- Domain: $15/year
- Hosting: $120-360/year (renewal prices often increase 200-400% after promotional period ends)
- Plugin renewals: $50-200/year
- Year 2 Total: $185-575
- Year 3 Total: $185-575
3-Year Total: $545-1,705
Astro + Cloudflare Stack Costs
All 3 years:
- Domain: $15/year (any registrar)
- Cloudflare Pages: $0/month (500 builds, unlimited bandwidth)
- Comments: $0 (Giscus via GitHub)
- Analytics: $0 (Cloudflare Web Analytics)
- Per year: $15
3-Year Total: $45
If you exceed free tier (unlikely for blogs):
- Cloudflare Pages Pro: $20/month for 5,000 builds/month
- You’d need to deploy 167+ times per month to need this
The Real Savings
- 3-year savings: $500-1,660 minimum
- Time savings: 2-4 hours/month not dealing with updates (72-144 hours over 3 years)
- Performance gains: 7x faster load times (86% Speed Index improvement)
I could make $100-300 in commissions recommending WordPress. Instead, I make $0 telling you the better solution.
Troubleshooting Common Issues
Build Fails on Cloudflare
Problem: Site builds locally but fails on Cloudflare Pages
Solutions:
- Check Node version:
# In your project
node --version

# Cloudflare Pages uses Node 18 by default
# Add to package.json if you need specific version:
"engines": {
  "node": ">=18.0.0"
}- Environment variables:
- If using any API keys, add them in Cloudflare Pages dashboard
- Settings → Environment variables
- Build command issues:
- Cloudflare settings should be:
- Build command:
npm run build - Output directory:
dist - Root directory:
/(or your subdirectory)
- Build command:
Images Not Loading
Problem: Images work locally but 404 in production
Solutions:
- Check paths:
✅ Good: 
❌ Bad: 
❌ Bad: - Public folder structure:
public/
  images/
    photo.jpg    ← Reference as /images/photo.jpg
favicon.svg ← Reference as /favicon.svg- Case sensitivity:
- Local (Mac/Windows): Case-insensitive
- Cloudflare (Linux): Case-sensitive
Photo.jpg≠photo.jpgin production
”Module not found” Errors
Problem: Import errors after deployment
Solutions:
- Clear and reinstall:
rm -rf node_modules package-lock.json
npm install
npm run build # Test locally- Check imports:
✅ Good:  import Layout from '../layouts/Layout.astro';
❌ Bad: import Layout from '../layouts/layout.astro'; // Wrong case- Dependencies:
# If you installed a package, make sure it's in package.json
npm install package-name --save  # Not just npm install package-name
Slow Build Times
Problem: Builds take >5 minutes
Solutions:
- Clear cache:
rm -rf .astro
npm run build- Image optimization:
- Use Astro’s Image component instead of raw
<img>tags - Images are optimized at build time (takes longer but worth it)
- Too many pages:
- If 1,000+ pages, consider incremental builds
- Check Astro’s deployment docs
Comments Not Showing Up
Problem: Giscus comments don’t appear
Solutions:
- Check repository is public:
- Giscus requires public repo
- Private repos won’t work
- Verify Discussion category:
- Repo → Discussions → Must have category that matches Giscus config
- Check
data-mapping:
<!-- Should usually be pathname -->
data-mapping="pathname"

<!-- Not specific paths -->
data-mapping="url" <!-- Try this if pathname fails -->- Clear browser cache:
- Giscus script may be cached with old config
Everything Exploded?
Nuclear option (start fresh):
# Save your content first!
cp -r src/content/blog ~/backup

# Delete everything
rm -rf node_modules package-lock.json .astro dist

# Reinstall
npm install

# Test
npm run build
npm run dev

# If still broken, check Astro Discord for help
Still broken? Astro Discord has helpful humans who actually answer questions.
When You Should Actually Use WordPress
WordPress isn’t garbage, it solves different problems than static site generators. Use WordPress when you have:
1. Non-technical content teams
- 10+ writers who need a GUI
- People who panic at the command line
- Multi-stage approval workflows
2. Complex memberships
- Paywalls and subscription tiers
- User accounts with roles/permissions
- Member-only content areas
3. Heavy e-commerce
- Though Shopify is better
- If you’re stuck with WooCommerce ecosystem
4. User-generated content
- Forums, comments, user profiles
- Real-time interactions
- Dynamic content that changes per user
WordPress is a content management system. Astro is a static site generator. No matter how great static site generators are at generating HTML from text, they are not content management systems.
If you’re a developer writing a blog, you’re using the wrong tool and paying for features you don’t need.
Migration From WordPress (If Needed)
Export WordPress Content (5 minutes)
- WordPress Dashboard → Tools → Export
- Select “Posts”
- Download XML file
Convert to Markdown (2 minutes)
Use wordpress-export-to-markdown - an excellent open-source tool that handles the conversion properly:
npx wordpress-export-to-markdown

# Follow prompts:
# - Path to WordPress XML file
# - Output folder (./output recommended)
# - Include images? Yes
# - Include markdown? Yes
This tool preserves:
- Post content and formatting
- Featured images
- Image references in markdown
- Frontmatter with dates and authors
- Post metadata
Creates clean markdown files with proper structure, no cleanup needed.
Import to Astro (10 minutes)
- Copy markdown files:
cp -r output/posts/* src/content/blog/- Fix frontmatter (if needed):
WordPress export might have:
---
title: My Post
date: 2024-01-15
---
Astro needs (check your theme):
---
title: "My Post"
pubDate: 2024-01-15
description: "Post description"
---- Fix image paths:
# Old WordPress path:

# New Astro path:

# Copy images to public/images/
cp -r output/images/* public/images/Set Up Redirects (5 minutes)
File: public/_redirects (Cloudflare Pages format)
# Old WordPress URLs → New Astro URLs
/old-post-title            /blog/new-post-title     301
/category/tech/post-name   /blog/post-name          301
/page/about-us             /about                   301

# Catch-all for old structure (optional)
/*/                        /blog/:splat             301
Or use Astro’s redirect config:
File: astro.config.mjs
export default defineConfig({
  redirects: {
    '/old-url': '/new-url',
    '/old-page': {
      status: 301,
      destination: '/new-page',
    },
  },
});
Astro’s Built-In SEO Features
Astro provides professional SEO out of the box. These aren’t theme extras - they’re built into the framework:
XML Sitemap: Auto-generated at /sitemap.xml
- Automatically includes all your blog posts and pages
- Submitted by search engines automatically
- No plugin needed
Robots.txt (optional): Create public/robots.txt to customize crawler rules:
User-agent: *
Allow: /

Sitemap: https://yourdomain.com/sitemap.xml
Meta Tags & Social Sharing: Add to your post frontmatter to customize how it appears on social media:
---
title: "Your Post Title"
description: "Post description for search results"
pubDate: 2026-10-20
# SEO & Social Media
ogImage: "/images/post-image.jpg"          # Facebook/LinkedIn preview
ogType: "article"
twitterHandle: "@yourhandle"                # Twitter creator
canonicalUrl: "https://yourdomain.com/blog/post-slug"  # Prevent duplicate content issues
---
Canonical URLs: Prevent search engines from penalizing duplicate content:
---
canonical: "https://yourdomain.com/blog/post-slug"
---
Your theme’s layout components automatically render these meta tags into the <head> section. No manual HTML editing needed.
Schema Markup Ready: Astro handles structured data well. Most blog themes include JSON-LD schema for articles automatically.
The Hosting Disclosure Section
What I Make From This Guide
Cloudflare Pages: $0 (no affiliate program exists)
Astro: $0 (open source, no referral system)
Total commission: $0
What I Could Make
If I recommended WordPress hosting instead:
- Bluehost: ~$100/sale
- SiteGround: $50-120/sale
- WP Engine: $200+/sale
Why I’m not: This solution is technically better for developers. I make $0 recommending it, which is exactly why income-focused “blogging” sites won’t write this guide.
Where I DO Make Money
I’m not running a charity. I make commissions on:
- Scala Hosting (~$100/sale) - When you need actual VPS hosting
- ChemiCloud (~$100/sale) - WordPress hosting when static won’t work
- Hetzner ($0/sale) - Cloud VPS hosting when you need more power than a VPS can provide
I rank by value, not commission. Cloudflare Pages is objectively better for dev blogs even though it pays me nothing.
The Bottom Line
What You Just Built
- Professional developer blog
- 97/100 PageSpeed score (vs 56 on WordPress)
- 1.2s First Contentful Paint (vs 3.6s WordPress)
- 2.4s Speed Index (vs 17.4s WordPress)
- $0/month hosting (vs $10-30/month WordPress)
- 0 hours/month maintenance (vs 2 hours/month WordPress)
- Complete control over code
Time Investment Summary
- Initial setup: 30-45 minutes
- Writing posts: Same time as WordPress (markdown vs visual editor)
- Publishing:
git push(30 seconds) - Monthly maintenance: 0 minutes (vs 2 hours updating WordPress)
The Tradeoff Matrix
Choose Astro + Cloudflare if:
- ✅ Comfortable with markdown
- ✅ Want maximum performance
- ✅ Prefer git-based workflow
- ✅ Value zero maintenance
- ✅ Okay with command line
Stick with WordPress if:
- ❌ Non-technical content team
- ❌ Need user roles/permissions
- ❌ Heavy e-commerce requirements
- ❌ Must have visual page builder
- ❌ Real-time user-generated content
Additional Resources
Official Documentation:
- Astro Documentation - Excellent docs, actually helpful
- Cloudflare Pages Docs - Deployment guides
- Astro Blog Tutorial - Learn Astro basics
- Youtube tutorial
Community & Support:
- Astro Discord - Active community, helpful people
- Astro GitHub Discussions - Q&A format
- You can also reach out to me personally
Performance Testing:
- PageSpeed Insights - Test your site
- Compare to websiterating.com - Real migration results
Related Guides:
- Best cPanel + LiteSpeed Hosting - When you need more than static
- Best Nginx WordPress Hosting - If you must use the WordPress CMS
- Managed WordPress Hosting - If you must use WordPress hosting, know this first
- My Scala Hosting and ChemiCloud reviews
Why This Guide Exists
Nobody else writes this because Cloudflare doesn’t pay commissions. Astro doesn’t have an affiliate program. But this stack is objectively better for developer blogs, proven by websiterating.com’s own migration showing 86% Speed Index improvement.
You deserve to know it exists.
Your move: Follow the setup guides above, deploy to Cloudflare, write your first post. Or keep paying $20/month for a site that loads in 17 seconds because that’s what every affiliate-commission-optimized “creating a blog” tutorial tells you to do.