
Recording your screen used to require downloading third-party software. But now, most modern devices come with built-in screen-recording functionality. Whether you want to screen record a tutorial for YouTube or show something to your coworkers, recording your screen is as easy as clicking a few buttons.
In this guide, I will show you how to screen record on iPhone, Mac, Windows 10, and Android devices.
How To Screen Record on iPhone
Although the latest versions of Apple iPhone iOS make screen recording really easy and simple, you might need to enable it from the settings first.
To enable screen recording, open the Settings app on your iPhone. Now, scroll down to find the Control Center submenu and open it:

The Control Center menu allows you to customize the order and visibility of the quick-access settings you see in the control center.
If you can find Screen Recording in the Include section of this menu already, then you can skip over this step:

But if you can’t find it in the Include section, then scroll down until you see Screen Recording under the More Controls section.
Once you find it, click the green Add button next to it to add it to the Included Controls section:

Now that Screen Recording is enabled, you can start recording your screen by opening the Comand Center by swiping down from the top of your screen and tapping the Screen Recording button:

When you tap the Screen Record button, you will see a screen that asks you which app you would like to record:

You will also see an option to record your microphone at the bottom of the screen. Select the app you would like to record and click the Start Recording button to record your screen.
Your phone will give you a 3-second wait before it starts recording your screen. You can close this screen and your phone will record whatever content you want it to record.
Once you are done recording, click the red button in the top left of your screen to stop recording:

How To Screen Record on a Mac
Apple macOS makes it really easy to record your screen. You don’t even need to set it up like Windows and iPhone.
Just one keyboard command brings up a quick toolbar that lets you record your screen and take screenshots.
Whenever you’re ready to record your screen, press Cmd + Shift + 5 to open the MacOS’s built-in Screenshot Utility.
It shows up at the bottom of your screen as a toolbar with some handy options:

In the toolbar, you will see two options for recording your screen:
- Record Your Entire Screen: The first option lets you record your entire screen. This option is great for tutorials/videos that require you to change between many apps. If you have multiple screens, you can select the screen you wish to record.
- Record Selected Portion of The Screen: This option is helpful if you just want to record a part of your screen. This is useful for recording a tutorial/video that only requires capturing a small part of your screen. This option displays a box on your screen that you can drag around and resize based on your requirements. Only the part of your screen inside this box will be recorded.
Once you have selected what you want to record, you can click the Record button to start recording:

Once you’re done recording, click the stop button on the top right of your screen to stop:

You can also change other options before you start recording from the options menu in the toolbar:
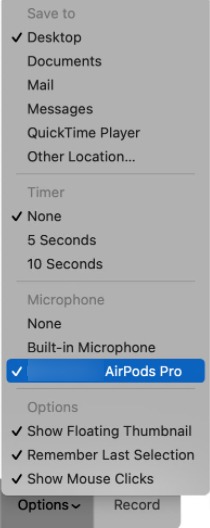
- Save to lets you pick where your recordings and screenshots would go.
- If you enable Timer, MacOS will wait until the timer runs out before it starts recording.
- Microphone lets you decide what microphone to use if you have multiple microphones connected. It also allows you to mute your microphone by selecting None.
How To Screen Record on Windows 10
Microsoft Windows 10 Comes with a feature called Xbox Gamebar that lets you capture highlights in video games. But that’s not all that it does. It can also be used to record your screen even if you aren’t playing a videogame.
Before you can use this feature, you need to enable it in the settings. To enable it, from the start menu, open the Settings app. Now, select the Gaming menu from the left:

Now, select the Captures submenu:

Now, enable the Record what happened option:

In this menu, you can also change other settings such as frame rate and quality of the video that will be captured.
You will also want to enable the Xbox game bar shortcut button from the Xbox Game Bar submenu under the Gaming menu:

Now, you can record your screen by pressing Win + G on your keyboard. (Win is the Windows key right next to the Alt key.) This will display the Xbox Game Bar overlay:
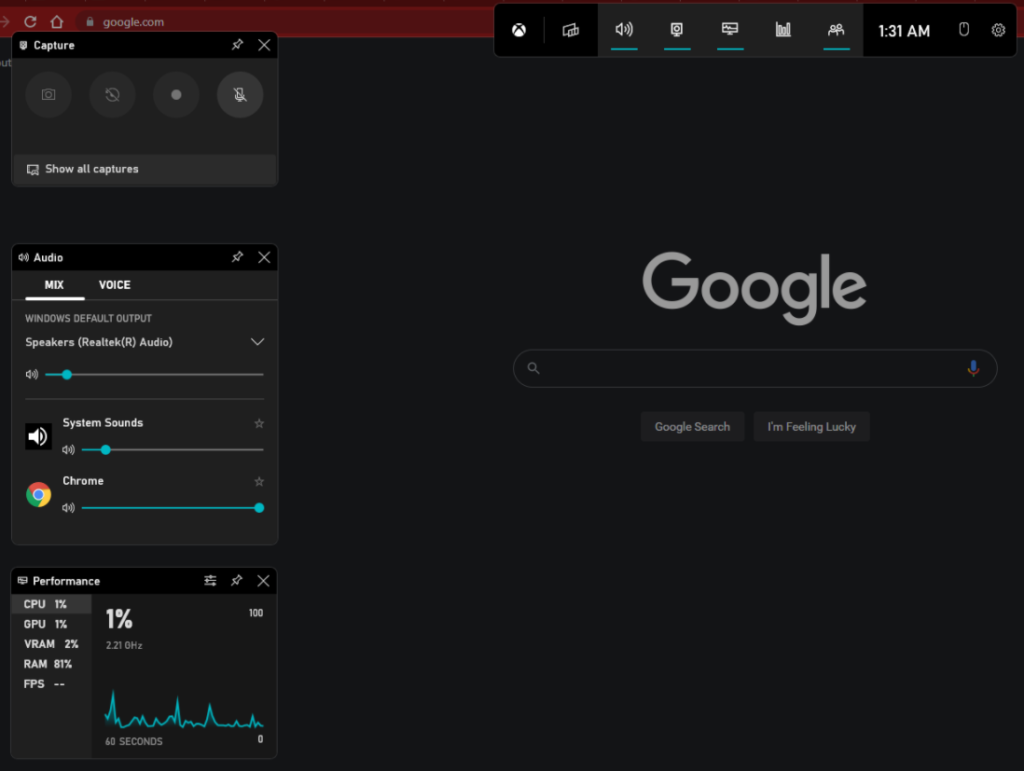
On the top left of your screen, you will see the Capture widget that allows you to start and stop capturing your screen. Click the Record button to start recording:

You can disable recording your microphone by enabling the fourth option. You can also see all the captured videos by clicking the Show all captures button at the bottom of this widget.
For some Windows 10 users, the Game Bar doesn’t record the screen when there’s no game open. You have two options if you are facing this issue.
You can start a game, then start recording, and then minimize the game to record your screen. Or you can use a third-party screen record software for Windows.
If you decide to use a third-party software, here are some good options:
- Camtasia: One of the most popular screen recording software for Windows on the market. One of the easiest options for recording your screen. Offers a free trial but is very expensive.
- Bandicam: Another popular choice. It offers a free, limited version to test the waters.
- OBS: OBS is completely free and open-source. You can use it for a lot more than just recording your screen. You can even use it to broadcast yourself live on YouTube and other streaming services. But it’s a bit difficult to learn.
How To Screen Record on Android
Whether or not your Google Android phone supports screen recording depends on what version of Android it’s running. If it’s the latest version, you can record your screen without needing any third-party software.
To check if your phone supports Screen Recording, swipe down from the top of your phone to open the notifications drop-down and then swipe again to see the quick actions section:

Now, look for Screen Recorder. You might have to scroll around a little to find it:

If you can’t find the Screen Recorder feature, try looking for it in the Edit option that hides unused quick actions:

If you can find the Screen Recorder quick action in the Edit menu, drag it to the top to make it available in the Quick Access menu.
If you have found the Screen Recorder feature already, you can start recording your screen by tapping the Screen Recorder button:

You will see a small camera icon in the notification bar when you start recording:

You will also see a floating stop button that tells you how long you have been recording. Click the stop button whenever you are done recording your screen to stop.
If your Android phone doesn’t offer built-in Screen Recording features. You can use the AZ Screen Recorder app:

It’s free and you can download it from the Playstore. You might need to allow it some advanced permissions before it can record your screen.
Summary
The latest versions of Windows, iPhone, and Mac offer built-in ways of recording your screen. If you’re a Windows user, some users won’t be able to record their screen using Xbox Game Bar due to a rare bug. If that’s the case, use one of the third-party software listed in the Windows section.
When it comes to Android, if your smartphone comes with the latest Android version, then you will be able to record your screen in only a couple of taps. If not, then you can use a third-party app from Playstore.