
Here I’m going to show you how just how simple it is to take the first step toward creating your own website or blog with Bluehost. The very first thing you need to do before hosting your site is to sign up with Bluehost. But how do you actually do it? What’s the process?
Now, there are a bunch of different web hosts you can use. One of the better options for beginners is Bluehost – review here.
They’re definitely one of the cheapest options around, they’re beginner-friendly and give you a free domain name, and are a good all-around web host for your personal or small business site.
Bluehost has a lot of good features that make it a good option for web hosting, for example:
- The ability to cancel at any time, their 30-day, money back guarantee gives you full refund.
- Simple to use control panel (an especially good feature for people new to web hosting and website building).
- Free domain name, unmetered bandwidth, unlimited domains, and unlimited email accounts (except on their basic plan), plus lots more.
- Click-of-a-button WordPress installation (See my WordPress installation guide here).
So, with that out of the way, let’s cover how do I sign up with Bluehost?.
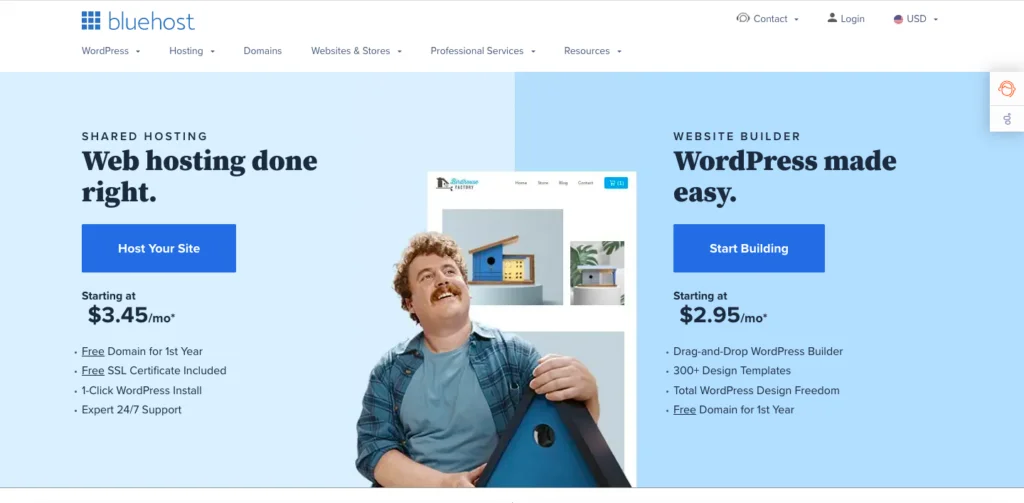
Step 1. Go To Bluehost.com
Go to their website and look for the “get started now” button. It will be prominently displayed on the homepage.
Step 2. Choose a web hosting plan
Once you click the get started now button, you are given four shared hosting plans to choose from. Basic, plus, choice plus, and pro.
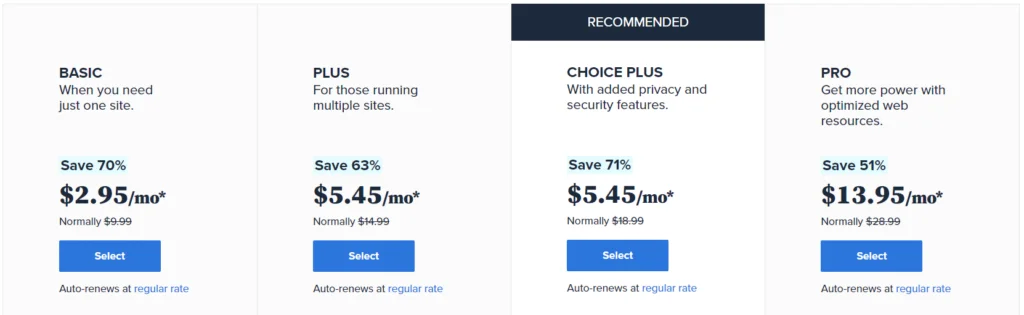
Here are some of the features you will get with each one (all plans come with a free domain name):
Basic plan
- Host one website with 50GB SSD space
- Unmetered bandwidth
- 5 email accounts with 100MB per account
- [This is the plan I recommend you start out with]
Plus plan
- Host unlimited websites with unmetered space
- Unlimited email accounts with unlimited storage space
- Included spam protection
Choice plus plan
- Host unlimited websites with unmetered space
- Unlimited email accounts and storage space
- Includes website backups, domain privacy, and more
Pro plan
- Host unlimited websites with unmetered space
- Unlimited email accounts and storage space
- Includes spam protection, SSL certificate, dedicated IP, domain privacy, and more
I recommend that you start with the basic plan, as it’s the cheapest and easiest to start with.
You can always upgrade later if you want more power and features.
Go to Bluehost.com for the latest prices – and current deals
If you only intend to run a single business website or a personal blog, then you really should not need to go for a more expensive package.
The plus, choice plus, and pro Bluehost plan really only come in handy if you intend to run several websites at once, or if you intend to launch an ecommerce site using WooCommerce.
Step 3. Choose your domain name
Once you have picked a plan you will be asked to enter your domain name.
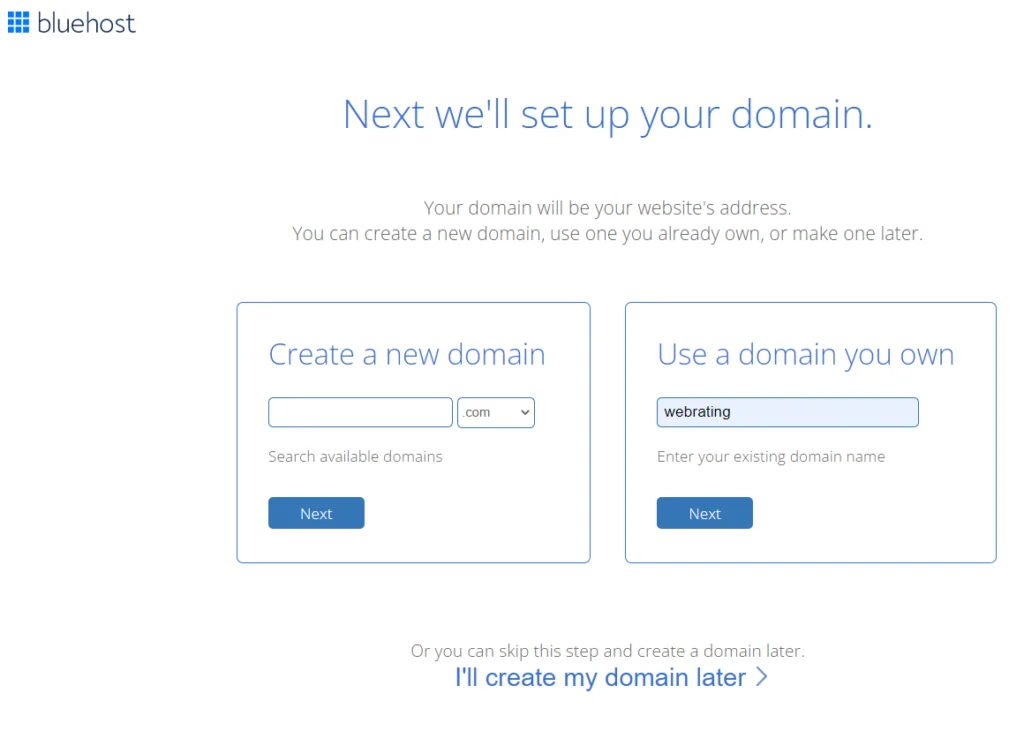
You will be given two options, you can register a “new domain” (which is included for free for the first year).
Or if you already have a domain you want to use you choose “I have a domain.”
Enter the domain name and then choose whether you can your website to be .com, .org, .net, etc.
You can also skip this step and register your domain later.
Step 4. Enter your personal information, and choose optional extras
Once your domain name is taken care of, you will be asked to enter personal information to create your account.
It is the standard stuff you see on every website’s checkout, first and last name, email, password, country, phone number, etc.
You will also be asked to pick a payment option; Bluehost allows you to pay via credit card or PayPal.
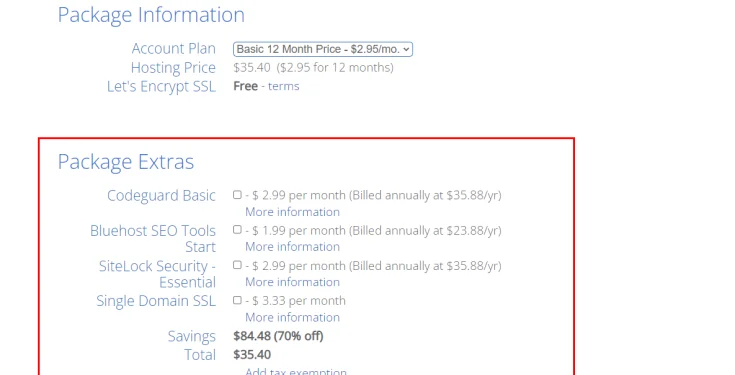
You are also presented with a couple of package extras, that are paid add-ons.
Not all the addons are necessary, so I will briefly explain each one, so you can know if you need them or not.
Codeguard Basic
This addon gives you automated daily backups for your site, plus monitoring and one-click restore (in case you have to roll back to a previous version of your website). If you plan on using WordPress then there are plenty of security plugins that give you these features, and for free.
I don’t recommend that you get this add-on.
Bluehost SEO Tools
This paid add-on gives you a personalized marketing analysis and report of your website, plus it automatically submits your Bluehost hosted website to Yahoo!, Bing & Google, and it gives you a keyword discovery tool. These are all very basic tools, and again if you plan on using WordPress then there are plenty of free SEO plugins to use.
I don’t recommend that you get this add-on.
SiteLock Security Essential
This $1.99 a month add-on provides some extra security for your domain, including malware scans DDoS protection, and some other standard website protection. This add-on is best suited for people running websites where products are sold and payment information may be stored.
I don’t recommend that you get this add-on.
Single Domain SSL Certificate
An SSL certificate protects your customer’s sensitive information. A free SSL certificate is already included, this add-on is best suited for people running websites where products are sold and customer personal details and payment information may be stored.
I don’t recommend that you get this add-on.
Step 5. That’s it – You’ve signed up with Bluehost!
Once you have chosen your add-ons you are finished. Hit the “submit” button and you’re done.

You will receive a welcome email very shortly confirming your hosting account with Bluehost and it has all the login details you need to get started.
Congratulations, you have now taken your first step towards actually creating your website. The next step is to install WordPress (See my Bluehost WordPress installation guide here)
If you haven’t already, go to Bluehost.com and sign up for hosting right now. Also, if you for whatever reason need to cancel Bluehost go here.
Recent Improvements & Updates
Bluehost constantly improves its hosting services with faster speeds, better security, and enhanced customer support. Here are just some of the recent improvements (last checked April 2024):
- iPage is now partnered with Bluehost! This collaboration brings together two giants in the web hosting industry, combining their strengths to offer you an unparalleled service.
- Launch of Bluehost Professional Email service. This new solution and Google Workspace are designed to elevate your business communications to new heights, enhancing your brand’s image and boosting customer confidence.
- Free WordPress Migration plugin for any WordPress user can be downloaded directly to a customer’s Bluehost cPanel or WordPress admin dashboard at no cost.
- New Bluehost Control Panel that lets you manage your Bluehost servers and hosting services. Users can use both the new Account Manager and the old Bluerock control panel. Find out what the differences are here.
- Launch of Bluehost WonderSuite, which consists of:
- WonderStart: A user-friendly and personalized onboarding experience that accelerates the website creation process.
- WonderTheme: A versatile WordPress theme developed by YITH that empowers users to showcase their websites effectively.
- WonderBlocks: A comprehensive library of block patterns and page templates enriched with images and suggested text.
- WonderHelp: An AI-powered, actionable guide accompanying users throughout the WordPress site-building journey.
- WonderCart: An eCommerce feature designed to empower entrepreneurs and maximize online sales.
- Now offering the advanced PHP 8.2 for improved performance.
- Implementing LSPHP a handler to accelerate PHP script processing, enhancing website performance by optimizing PHP execution.
- Enabled OPCache a PHP extension that stores precompiled script bytecode in memory, reducing repeated compilation and resulting in faster PHP execution.
Reviewing Bluehost: Our Methodology
When we review web hosts, our evaluation is based on these criteria:
- Value for Money: What types of web hosting plans are on offer, and are they good value for money?
- User Friendliness: How user-friendly is the signup process, the onboarding, the dashboard? and so on.
- Customer Support: When we need help, how quickly can we get it, and is the support effective and helpful?
- Hosting Features: What unique features does the web host provide, and how do they stack up against competitors?
- Security: Are essential security measures like SSL certificates, DDoS protection, backup services, and malware/virus scans included?
- Speed and Uptime: Is the hosting service fast and reliable? What types of servers do they use, and how do they perform in tests?
For more details on our review process, click here.